
Pedro Talavera / Salvador Ibáñez guitar from 1900To present this guitar I will do the accompanying text in English.Very little can be found on the Internet and even AI only tells usthe story my friend, Ton Bogaard already wrote on his site:guitarrasvalencia.wordpress.com where a lot more can be foundaround the several luthiers that were active there. This examplecertainly is one of them but when you know that a lot of partsand even ornamentations were ordered at companies specializedin this sort of "guitar additions" it remains difficult to give aguitar its' final place and origin.A "luthier" called Pedro Talavera could be responsible for thebuilding of this guitar but assumptions are already there thatthese Talavera labelled guitars are coming from SalvadorIbanez, Jose Parres or even Jaime Ribot. When the innerwood work of those luthiers can be studied we can possiblysay a bit more.To my opinion this is an outer heel form that the Valencianluthiers often made during the existence of the SalvadorIbanez workshop and later with his sons.As I stated earlier sometimes a company gave exclusive rightsto an importer or exporter and to avoid legal problems a kind of"fantasy name" not really existing, was put on a label.For a 120 year old guitar it is remarkable that the soundboardis completely crack free! Cleaning it and maybe give a fewlayers of French polish will do the job.These are some of the more severe problems I will have to deal with:A lot of cracks in the back. Maybe veneering could be the solution.Or replacing? I will discuss that the coming week with some people.As there are too many cracks on the back I figured the first step wouldbe to remove the back and inspect all the glue work, also from thesoundboard. A very strange way of placing the glue blocks, though!I will come up with more pictures regarding that move.A rather wildly figured back. Beautiful for people that are lessinterested into construction as these backs are more prone tocracking. The rather "dull" figured backs will hold much longer.The heel on this guitar however is more rounded as opposed tothe heel on the 1900 Siccas example.You can click on this picture to study the beautiful inlaysof which only one piece is missing! Exactly this rosette canbe found on a Siccas sold Salvador Ibanez guitar from 1900As often! Steel strings were mounted on this guitar.Never do this as a steel string set will pull on the bridgewith almost two times the force, around 75 kilograms.A centre inlay that stops when reaching the top.Most of the time the inlay is all the way up! On theSiccas sold Salvador Ibanez from 1900, the ornamen-tation also hasn't been inlayed to the top of the head.And here is the combination with the bridge that has been loweredbut can be restored to an almost original looking bridge of thattime. The soundboard has been equipped with a 5 fan bracing.To date this guitar even more exactly: The inlay on this bridgecan be found most of the time on guitars around 1900. The squareouter ends were a bit later invariably replaced with rounded outerends. When the sons of Salvador Ibanez were in charge the returnto the square appearance was done. To be continued.This picture has been taken from a YouTube video thatis about the restoration process of a Salvador Ibanez.The slightly slanted transverse bars immediately willraise questions, especially when luthiers are involved.The label on the guitar on this picture also dates this guitarto be from around 1900 as the exact year has been writtenon this label. As the guitar here above is a so called"Resonator" guitar, it has been mentioned on the label.It would be better to give my guitar a 1898 - 1902label when Salvador Ibanez also was busy on theBajada de St. Francisco 23. But at first I will be certainthis Pedro Talavera guitar is really coming out ofthe Salvador Ibanez workshops.And here the guitar, presented with its' back off.It will be possible now to check all the glue workbut to prevent future problems some extra moveshave to be made. Though this top is completelyfree from cracks as often most of the time someproblems at both sides of the fingerboard in thesoundboard may occur in the future, especiallywhen the transverse bar closest to the heel hasn'tbeen sturdy glued anymore. A small second barwill be added. The sound won't change. I will alsoequip the sides with some braces here and thereand inspect and if necessary, reglue some glueblocks. A new glue strip for the back is ofcourse inevitable. According to the traditionin those times it will be a non carved strip.As I've mentioned earlier the slanted bars on the back.Though the guitar possibly receives a new back in thenear future, I will securely replace these bars the wayit has been done on the old back. A possibility is theveneering of a new piece of wood with this old back.It is always advisable to keep the transverse bars on theback (and front) a bit shorter as when temperature changesare involved they will expand and thus damage the sides.Only one repair on this side of the guitar, a bit clumsy donewith paper (!) but what is immediately noticeable are the glueblocks. The alternate placement of the glue blocks I alreadyknew from the Telesforo Julve guitars but this is even morework and possibly could have influence on the freelyvibrations of the soundboard to my opinion. A luthiersuggested it could have been done to strengthen thesoundboard as the edge inlays are quite big in width.Alass, a bit damaged during the back removing process.I can have it cured as a girlfriend of mine is really goodat digital repairing this label.The form of the inner heel block can also tells us alot about who actually built this guitar. To my opinionexactly the same as sculpted in Salvadore Ibanezguitars of that time.The endblock is much too thin to my opinion as are theglue strips for the back. As this is the possibility to makea real neck reset, glue work has to be done in a properway. By diminishing the distance inner heel / end blockyou are able to change the angle neck / body and thusyou can create a very well playable guitar withouthaving to change the fingerboard and fretwork.OK, on the picture it all looks still reasonable but inreality I doubt if I can reuse it. When making a neckreset the plantilla will be slightly different so I willneed some extra pieces to cure that. Maybe too muchwork and what will be the result? I do not expecta new back will diminish the sound qualities.Some side reinforcements to prevent problems (and cracks)in the future. Also an extra transverse brace has been placedabove the original one that is glued just above the soundhole.When that brace loosens it more than often happens thatthe soundboard is developing cracks alongside thefingerboard. In present times most builders are placingsuch an extra brace to prevent those damages due to thetension in that area , most of the time even wider executed.Also some soundboard braces have been reglued. Makingeverything free from glue traces caused by spilling glue isin fact not necessary but gives a much neater appearance.I've made the glue strip for the back a bit more wide in orderto compensate the changed plantilla that occurs when removingthe back. Making a wider centre strip was an option that cameto my mind but then all the inner (original) woodwork aroundthat centre part of the back would have to be renewed.It remains a bit strange: this way of placing the glue blocksfor the soundboard and in fact labour intensive. It musthave been an experiment from one of the workers at theSalvador Ibanez workforce and maybe therefore this guitarhas been provided with a "Pedro Talavera" label (?)As I was forced to make a neck reset some extra gluesurface on the endblock was advisable to my idea.Therefore I've thickened that part a bit.And yes, I've decided to keep the original Brazilian /indian rosewood back as it is a part of this guitar andhistory around the Salvador Ibanez workshop.During restoration it is always good to make pictures.So here the repaired back has been reinstalled, with aserious neck reset in mind. It is a tedious process to doit the right way. I had to make some extra tools beforeI've glued the repaired back to measure the distancebetween the heel and the endblock that was enough tofinally give this guitar a good playing action in the end.Here and there it will be necessary to glue some splintsof wood to the surroundings to fill out the 'spaces" hereand there. The slightly wider glue strip for the backenables me to reduce that to the minimum.Some cleaning sessions with alcohol will clean the sound-board before some final French polishing layers will beapplied. The bridge here has been remodeled as some-one replaced a part of it but did that in a bit clumsy way.However, it was a wise decision to built in a sort ofoctave compensation to keep the guitar in tune,especially in the higher positions.The first layer of shellac liquid. Of course the final result onboth sides and back will be much darker and most likely in theway it was when the guitar was just finished. Over time theselacquers are becoming more yellowish in appearance.


Hiroshi Tamura P50

Guitars that were produced in the seventies and eighties.
These instruments are not that widely known as e.g. the
Masaru Kohno or the Juan Orozco guitars but they are
in fact soundwise no less. Very well built with even a
lot of similarities to the afore mentioned luthiers.
Ebony fingerboard and a 655 mm scale has been used
for this guitar that posesses a remarkable sound
reminiscent of a real concert instrument. Regarding
the veneered sides: Let us not forget that Jose Ramirez
even veneered his concert 1A model on sides and
back. He experimented a while by using solid
rosewood on a few of these models. I was able
to compare the two different models. The solid
rosewood example had a slightly darker sound
but differences were very small.....

Veneered back and sides that appear to be Brasilian
rosewood to me but a very narrow grained solid
soundboard that has been strutted very traditional:
A seven fan placed pattern with two closing struts.
The top has been glued to the sides with blocks
the way the Spanish luthiers tend to work.

This guitar hasn't been taken care for in a proper way
by looking at the damages on the right. These cosmetic
flaws will be treated in the near future as this 1972 guitar
further survived time in a remarkable way.

A gracefully designed headstock and the odd thing here
is that the standard distance between the axes of the
tuners, 35 mm, is not present here. The former owner
had to make a move to some very cheap and poor
working individual tuners when the original tuners
were not in a working order anymore. Strange thing
is also that a rather cheap plastic topnut was mounted
as well on this guitar. I've changed it into an ivory
one of course with a proper spacing. The tuners will
be changed as well to good working ones.

A simple but satisfying solution was to place pieces
of messing between these tuners that were sawed at
first to be able to mount them properly. Now tuning
is on parr with the standards of this guitar.

Some marks can be determined here as well in the
soundboard but on a rather cheap guitar as the "lower"
P50, the choice for a Brasilian wood bridge is quite odd.
A new bridgebone has been placed as well. Inner gluework
is very neat but no inner heel has been provided with this
instrument and in that way you could compare it with the
Juan Orozco model 8 guitar though the Tamura has more
qualities regarding sound. Just check the Blog I made
about the Juan Orozco guitars regarding Japanese guitar
models and their way of pricing them. A model P 50 from
1972 could be easily compared with a model P 100 from 1978.
From a Japanese source I found out that the two Tamura
brothers did have a disciple: Mitsuru Tamura is one of the
founder of Asturias guitars, he is an interesting character,
a national athlete on clay shooting and a noted golfer and
bowler as well as a great player.

The repair under the bridge can be seen by
clicking on this picture.

Now matched up to the color of the rest
of the soundboard.
A factory made guitar from Hijos de Vicente Tatay from which
a lot of examples must have been made. The same models were
delivered to the Ramirez company in Madrid. Those guitars can
be recognized having a dark blue label. As one of the former
employees told that apart from the whole bunch of guitars from
Valencia some bags of rice were delivered as well as there
was shortage of about everything after the civil war and the
second world war. In order to make a decent instrument of it
I was forced to redress the frets which were made out of copper
and showed file traces as was common on these student guitars.
The next move is to remove the ugly varnish on the fingerboard.
Now it looks fresh again and feels better though not entirely
original. The insert in the ladder braced soundboard is in fact
exactly in the seam of the two halves. Not even centered.
Another thing to be done was to reshape the roughly
modelled bridge as it came off allready and I wanted to lower
it in order to study the effect of it.

This picture shows us the walnut wood used for back and
sides. The crack in the lower left corner will be repaired
in the near future. No problem fixing that. As for the insert
in the soundboard: It can be brought back into the color of
the surrounding wood with a water based stain.

Shown here is the typical construction found in Valencia
of the neck to body. The lighter wood is the wittnes of it.

The rosette exist of simple concentric circles and some
"higher end" models show a slightly more decorated one
but the rest of those guitars in fact show the same mediocre
materials. That these guitars sound pretty good has a lot
to do with the resin in the wood that in fact cristallizes over
time and makes the top even more vibrant.
The typical label of the fifties can be studied here.

Presented here is the dark blue label used in the Jose Ramirez
branded student guitars of the fifties from the past century. In
fact Valencia imported instruments as the excerpt from the
Manuel Rodriguez book here beyond attests.

Hijos de Vicente Tatay (Mahogany soundbox)

The recently added Spanish guitar with the frets removed
as the action was too high and the thickness of the fret-
board is bigger towards the head. There a part of the so-
lution can be cured. The bridge is way too heavy so that
part will be sanded down as well to normal proportions.
A little more elaborate rosette completes the 3 pieced
soundboard. Scale 650 mm. This instrument also is
equipped with a ladder bracing.

Often these guitars are executed with walnut sides
and back. On this example they used mahogany.
The fingerboard is made from a dense hardwood but
not really detectable. Spruce topped soundboard
in three pieces as often was the case on the cheaper
Valencian made guitars. No fan strutting, just a
simple transverse bar just below the soundhole.

A little bit clumsy glued, the label just came loose
but that was the opportunity to have it properly photo-
graphed. Bofill & Roig were only exporters. Of course
we are curious in how this guitar behaves alongside
the walnut example here above.

And the somewhat more elaborated rosette. After a set up
with new strings this example from Hijos de Vicente Tatay
prooved to be sounding way better than the one here
above. That one has been sold recently: You simply
can't keep every guitar you're laying your hands on!
Want to know more around this brand and in general
about the Valencia made guitars, just check this site:
www.guitarrasvalencia.wordpress.com
High End "Vicente Tatay Tomas"

This company churned out tons of student ment guitars
from about 1958 onwards. A more precise dating can be
done by observing the label. It will be explained.

Most student guitars from the first Era were supplied with a
sort of "Torres" headstock but simplified and less graceful.
This headform can be found on the intermediate instruments.

Fretwork never seemed to be the first option for Valencian
companies in making a finely playable guitar. Often the
copper frets were there. It was not on this one but after
placing the frets, flattening out then was their last move,
so no crowning as that was too time consuming.
A rather small scale! 640 mm.

Surprisingly was that this example was equipped with a
narrow grained quality top that even could have been used on
a fine concert instrument. The rosette also was a step above the
quite common concentric circles. A bit damaged but stable.

A closer look will learn that the colours of the rosette nicely
match the darker colour of the soundboard that is solid as
one might expect from a decent Spanish guitar.

The transvere bars were interesting in a way that I've only came across
this modelled bars in a high end Francisco Esteve / Manuel Adalid
guitar. To my opinion not a coincidence, as the knobs on the tuners
also do resemble the Esteve / Adalid guitar in this Blog.

Difficult to investigate on this picture but I think the bridge
to be made out of Brasilian rosewood as could be the finger-
board and headplate. The covering of the string tieblock is
a later addition.

This guitar already has a whole life behind itself as some
crudely made restaurations attest. I always try my best
but on the other hand things that happen during a guitars
lifetime might be showed as well. I made an insert
in the outer heel of this guitar as it probably got damaged
by falling behind on its' back.

Also the centre inlay in the back is a sign of a
higher end guitar. I was very curious to learn how it
would sound and that was no disappointment!

In order to clear things up a bit I kind of "shaded" the heel
with a waterbased stain. After that the varnish comes of course.
Inlayed on the sides as well and lined with a rosewood strip.
When the guitar's neck on the label is pointing to the
right the guitars are from before 1973. After that the
head is pointing to the left.
Want to know more around this brand and in general
about the Valencia made guitars, just check this site:
www.guitarrasvalencia.wordpress.com
Vicente Tatay Tomas (Around 1960)

Presented here is the fully restored Vicente Tatay Tomas.
Regarding sound I figured it would be worth all the trouble.
You are able to enlarge this picture by clicking on it.

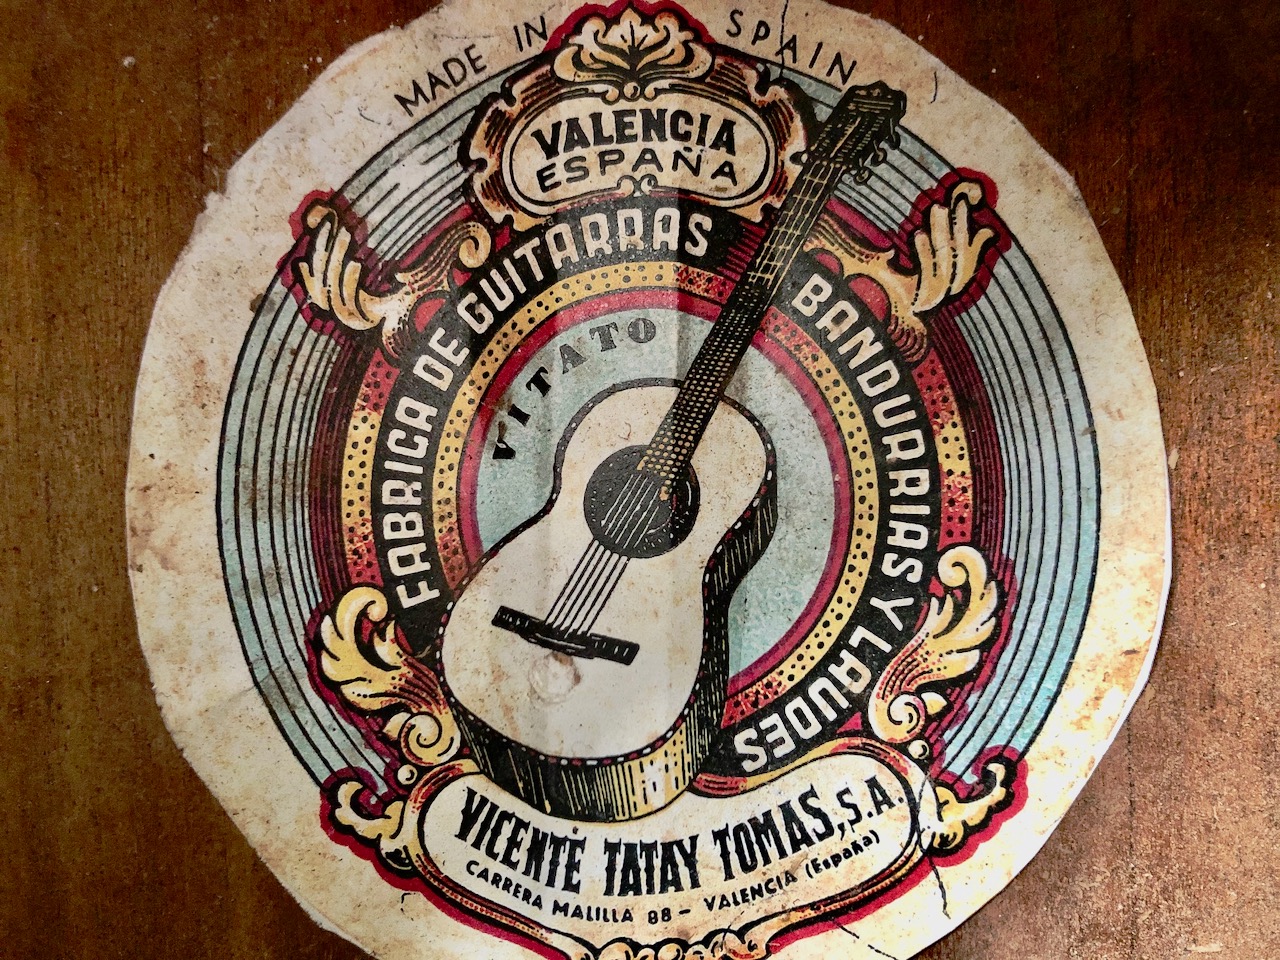
The "Vicente Tatay Tomas" label with the addition "Vitato".
The picture here above is all about the different labels used
and the period of time when they were sticked into the guitars.

When refinishing these guitars it gives you the
possibility to make the guitar free from scratches
especially the head as people tend to place their
instruments against a rather rough wall.

Is this walnut or mahogany? Difficult
to determine for these guitars as walnut
has a very different appearance.

The extra nineteenth fret has been added for
the "demanding pieces". I've modelled the bridge
as well. Checking the surface on which the bridgebone
is mounted is a must. After that process the bridge can
be lacquered again. Bridgebone as well as topnut are
made out of antique ivory.

A good angle over the bridgebone to assure
enough downwards pressure. The fingerboard has
been shaved a bit towards the head so playing comfort
together with the new frets is better than it ever was.
On this picture the narrow grained soundboard can
be admired. It even has that much wanted "silky pattern
in fact not common on these kind of lower end guitars.
But as we know the student Jose Ramirez were built
in the same factory simply for the sound it provides.

Fretwork is where these companies did a mediocre
job. Copper fretwire and after flattening them they
never were rounded again in those days. That is in
fact a must to obtain maximum playability. These
new nickel / silver frets are more substantial and thus
enhance the tone of a guitar. Also because of the fact
they are glued with a two component glue while the
too soft fingerboard wood dampens the tone with
less sustain a s a result.

The back of the head that is like new again.

Same thing counts for the front. The metal rollers
can be studied here which places this guitar around 1960.
Sound is typical for the Valencian School. Firm basses,
warm and full of character but now with a much better
playability.

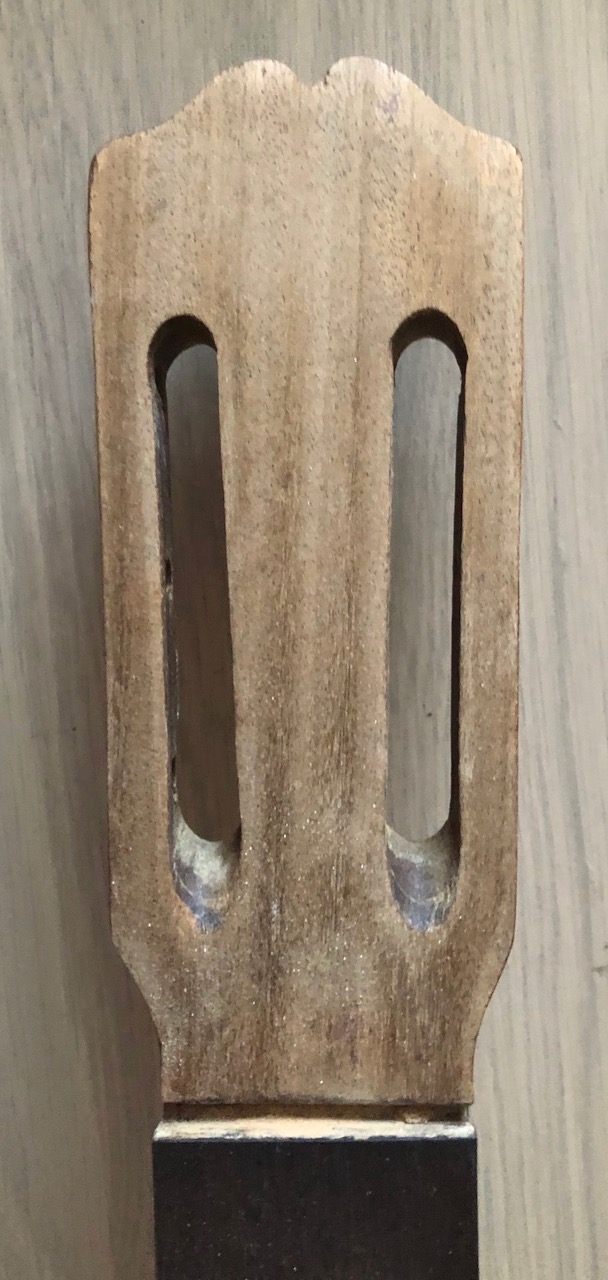
The typical use of a lighter piece of wood for the heel can be
studied here. As this softer wood was easier to work on it
was the way to speed up production processes.

This was the guitar when it came to me in its'
unrestored condition. Neglected but with no
structural damage. But seeing the fingerboard
with its' traces of fingernails something had
to be done.

The guitar with all the lacquer removed. Mind you,
this must not be done with sanding paper as that
makes the components thinner which is not the way to go.
Simply paint remover. And after the old frets removal
a correction has been made to make the right angle:
neck / body which ensures a better string action.

As the soundboard is a soft wood scratches will
happen of course during a lifetime but when not
too deep removal is easy. The bridge had traces of
sanding and filing. It has been removed as a lot
of bridges tend to be pulled up often because
players had putted a set of steel strings on it.
That is a "no go" area!

As there was a limited amount of time the factories sometimes
stained the bridge shortly before glued on the guitar. That causes
traces of stain on the wood of the soundboard as woodglue
contains water.

The old situation again. And it is understandable that
the tuners had to be cleaned. Width topnut: 50 mm.
Scale: 645 mm.
Here the sleeves for the rollers were uneven in length
but that can be cured of course before the lacquering.

The word "VITATO" exists out of Vi(cente) Ta(tay)
To(mas) but why they've added that?? Probably because
his brothers had labels with the same name,

And the label. A lot of Valencian labels can be found
on my friends site: Simply search for "Telesforo Julve"
or his site can be found nowadays under:
www.guitarrasvalencia.wordpress.com
Vicente Tatay Tomas (Around 1960)
Presented here is the fully restored Vicente Tatay Tomas.
Regarding sound I figured it would be worth all the trouble.
You are able to enlarge this picture by clicking on it.
The "Vicente Tatay Tomas" label with the addition "Vitato".
The picture here above is all about the different labels used
and the period of time when they were sticked into the guitars.
When refinishing these guitars it gives you the
possibility to make the guitar free from scratches
especially the head as people tend to place their
instruments against a rather rough wall.
Is this walnut or mahogany? Difficult
to determine for these guitars as walnut
has a very different appearance.
The extra nineteenth fret has been added for
the "demanding pieces". I've modelled the bridge
as well. Checking the surface on which the bridgebone
is mounted is a must. After that process the bridge can
be lacquered again. Bridgebone as well as topnut are
made out of antique ivory.
A good angle over the bridgebone to assure
enough downwards pressure. The fingerboard has
been shaved a bit towards the head so playing comfort
together with the new frets is better than it ever was.
On this picture the narrow grained soundboard can
be admired. It even has that much wanted "silky pattern
in fact not common on these kind of lower end guitars.
But as we know the student Jose Ramirez were built
in the same factory simply for the sound it provides.
Fretwork is where these companies did a mediocre
job. Copper fretwire and after flattening them they
never were rounded again in those days. That is in
fact a must to obtain maximum playability. These
new nickel / silver frets are more substatial and thus
enhance the tone of a guitar. Also because of the fact
they are glued with a two component glue.
The back of the head that is like new again.
Same thing counts for the front. The metal rollers
can be studied here which places this guitar around 1960.
Sound is typical for the Valencian School. Firm basses,
warm and full of character but now with a much better
playability.
The typical use of a lighter piece of wood for the heel can be
studied here. As this softer wood was easier to work on it
was the way to speed up production processes.
This was the guitar when it came to me in its'
unrestored condition. Neglected but with no
structural damage. But seeing the fingerboard
with its' traces of fingernails something had
to be done.
The guitar with all the lacquer removed. Mind you,
this must not be done with sanding paper as that
makes the components thinner which is not the way to go.
Simply paint remover. And after the old frets removal
a correction has been made to make the right angle:
neck / body which ensures a better string action.
As the soundboard is a soft wood scratches will
happen of course during a lifetime but when not
too deep removal is easy. The bridge had traces of
sanding and filing. It has been removed as a lot
of bridges tend to be pulled up often because
players had putted a set of steel strings on it.
That is a "no go" area!
As there was a limited amount of time the factories sometimes
stained the bridge shortly before glued on the guitar. That causes
traces of stain on the wood of the soundboard as woodglue
contains water.
The old situation again. And it is understandable that
the tuners had to be cleaned. Width topnut: 50 mm.
Scale: 645 mm.
Here the sleeves for the rollers were uneven in length
but that can be cured of course before the lacquering.
The word "VITATO" exists out of Vi(cente) Ta(tay)
To(mas) but why they've added that?? Probably because
his brothers had labels with the same name?
And the label. A lot of Valencian labels can be found
on my friends site: Simply search for "Telesforo Julve"
or his site can be found nowadays under:
www.guitarrasvalencia.wordpress.com
Geen opmerkingen:
Een reactie posten